D&D 5e Character Journal Project
"Part 1: Using Cards for Attacks"
Why Revamp the Character Sheet Anyway?
Because the default 5e character sheet kind of sucks, in my opinion. For new players, there is way too much noise - there are loads of things they won’t ever use, and plenty of space devoted to details that players never consult, and so little to what is frequently checked. For experienced players, there is still too much noise, and they have to create all sorts of hacks to write down everything going on. Eventually you end up having a half-hearted character journal, inventory sprawled in, at best, a crummy bullet journal. Don’t believe me? Ask around.
“But that isn’t noise!”
I understand, but bear with me: the worst part of the character sheet by far comes during combat. It’s the slowest, most tedious part of any game. Players have to balance the wants of the player and meta-knowlege, with in-universe knowlege and abilities. Players are expected to know all of their options, and if we can speed that up, combat will fly. I don’t like the idea of using digital systems, or even looking things up on a smartphone midway through a game, as it can be a big distraction point. So I planned this as something you could use for players of any skill level, and they can customize it as they go along.
Why Start Here?
I actually started my process by drawing up a character sheet in Inkscape by taking only what I needed. Explaining the process from there might be extremely daunting - so I decided to take a step back and explain things inside-out, from smallest unit to largest, so you can see the design language that ties it all together, without necessarily seeing how I got here (trial and error really). I hope that by explaining the simplest element (basic weapon attacks) I can build up to spell cards, companion character sheets, player companion sheets (and how we can account for different classes), and finally the journal system itself.
The Golden Rule
The whole thing is still very much a work in progress. I doubt many strangers read this blog - so if you know me, get in touch! And if you don’t, please reach out by creating a GitHub issue on this repository or the other one, and let’s get in touch!
Example Attack Card
Here is an example card, for an artificer character: can you guess what it is and how it works? It’s in black and white because
- I don’t own a colour printer;
- I find it fun to colour these in.
Top Left
Icon and Title: the card is called “Rifle”, and is referring to a gun.
Top Right
Range: this part of the card establishes if it’s a ranged attack, or requires touch, or has an area. If it’s blank, it’s because it affects yourself.
In this case, it has a range of 80ft, with disadvantage up to 320ft (if it’s 5 feet/square, 16 squares / 64 squares).
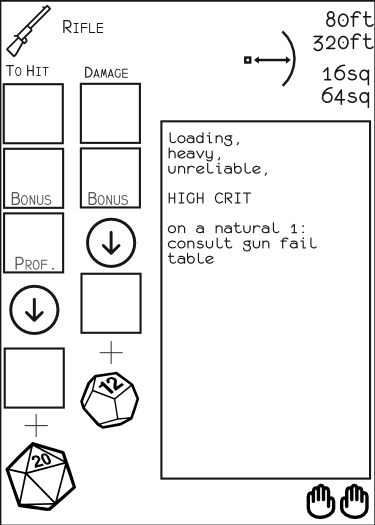
Basic 5e Rifle
Prints to 2.5in x 3.5in @ 150 dpi, TCG format.
Bottom Left
Dice to roll: We can see that the damage die here is a d12, and the attack roll is a d20.
Pre-calculations: We can also see that the values are pre-calculated: the first box is blank as some characters can use a stat other than STR/DEX to attack (in my artificer’s case, it would be INT).
Bottom Right
Handedness: how many hands it takes to wield this. It’s a two handed gun, so I would darken both hands.
All of this was built in Scribus, and can be found in its repository. Feel free to pull it down and rework it, or use it as-is. I will eventually get around to uploading PDFs and PNGs in the Files section.
Another Example: Dagger
Let’s say we have a dagger:
Top Left
Icon and Title: the card is called “Dagger”, and is referring to a knife.
Top Right
Range: this part of the card establishes if it’s a ranged attack, or requires touch, or has an area. If it’s blank, it’s because it affects yourself.
In this case, it has a range of 20ft, with disadvantage up to 60ft (if it’s 5 feet/square, 4 squares to 12 squares).
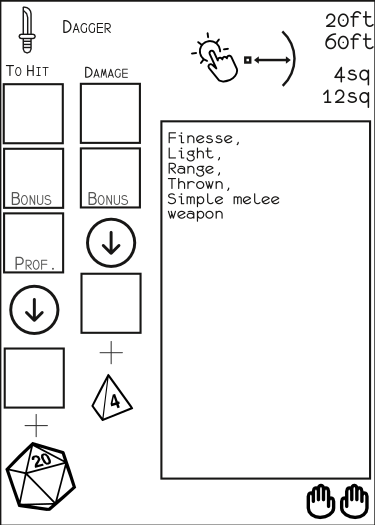
Basic 5e Dagger
Prints to 2.5in x 3.5in @ 150 dpi, TCG format.
Bottom Left
Dice to roll: We can see that the damage die here is a d4, and the attack roll is a d20.
Pre-calculations: We can also see that the values are pre-calculated: the first box is blank as some characters can use a stat other than STR/DEX to attack.
In the dagger’s case, as it’s a finesse weapon, players have the choice to use STR or DEX.
Bottom Right
Handedness: how many hands it takes to wield this. It’s a dagger, so I would darken one hand.
Dagger, Filled In
I’ve coloured in that dagger here, to show what it might look like printed and filled in (or just printed in colour). I colour in the dice as well, following the Chessex Nostalgia set, which itself follows the colours of the very first D&D dice set. This way you can also remind your players to “roll two blue ones” or “roll the white one”.
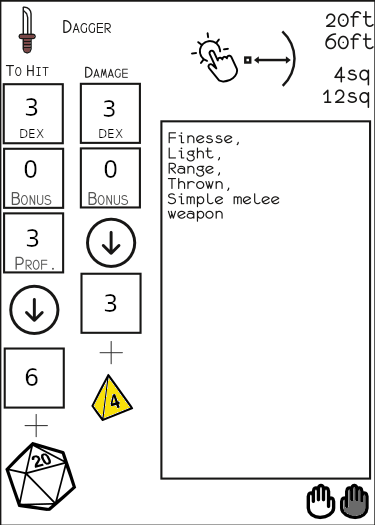
Basic 5e Dagger, coloured
Prints to 2.5in x 3.5in @ 150 dpi, TCG format.
Some friends have suggested that it might be better to print each type of card on different colours, to distinguish actions, movement, bonus action, reactions. I personally found it great to put a symbol at the bottom of cards to distinguish them, and reserve colour for smaller indicators (spell levels mainly).
Part of the advantage of preparing the document in black and white is that you could just use colour paper and not need to modify your documents. :)
Simplified Backside
You could also easily extend this to a simplified backside of the card, if you wanted to have two-sided cards:
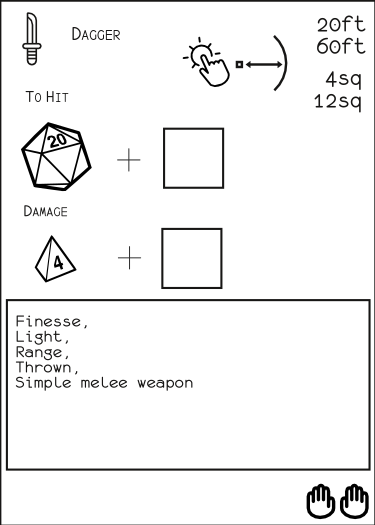
Basic 5e Dagger, backside
Prints to 2.5in x 3.5in @ 150 dpi, TCG format.
Why Use These Cards?
Some major advantages:
- Cards are easily exchanged amongst players. If your characters are in the habit of swapping equipment, it will make it a lot easier to keep track of who has what!
- Cards can be written on easily, and in this format have a fair amount of whitespace to make additional notes (eg infused or enchanted items, abilities that make them deal more damage or use more interactions per turn).
- Cards can also be handed out to players easily; a GM can prepare a deck of cards and hand them out as needed to players, as they buy or find equipment, as well as recycle them if they’re sold/traded back.
- It’s easy enough to treat the game like a board game, and lay out your cards to indicate what you have equiped.
We’ve actually been using this in a home brew system run by a close friend for years, and I’m sure the idea was not new to him either! It works for a reason!
What’s next?
My roadmap:
- Spell cards;
- Ability cards;
- Equipment/armour;
- Character sheet for a classless character;
- How I tie this together (why I say it’s a “Character Journal” and not just a “Character Sheet” anymore);
- Character sheet components for different classes;
- Companion sheets.